Art workshop~
Forum rules
Questions about Ren'Py should go in the Ren'Py Questions and Announcements forum.
Questions about Ren'Py should go in the Ren'Py Questions and Announcements forum.
- Deji
- Cheer Idol; Not Great at Secret Identities
- Posts: 1592
- Joined: Sat Oct 20, 2007 7:38 pm
- Projects: http://bit.ly/2lieZsA
- Organization: Sakevisual, Apple Cider, Mystery Parfait
- Tumblr: DejiNyucu
- Deviantart: DejiNyucu
- Location: Chile
- Contact:
Re: Art workshop~
Background variations
The most simple variations you can make on a Background are the coloring depending on the hour of the day (Morning/day, Afternoon, Night)
Now, based on specific elements of a location, you can make other variations as well. You could make a door opened and door closed version of a room, or a crowded street versus an empty street.
The good thing about variations is that most of the time you use the same backround without many modifications in lineart and/or base coloring.
Now a practical example: I have to make a background depicting my main character's bedroom.
The bedroom's description by my writer is the following (sorry for the possible bad english):
"A small and dull place, lacking colors or decorations. A lonely desktop with a laptop and a picture of his parents are the only equipments of the bedroom. A half-eaten sandwich decorates the bed"
So, I need a simple bedroom. That's not that difficult. I drew the walls and window in one layer, the curtains in another and a thrid one for the furniture. te Laptop and the sandwich have their own separate layers too.
Now what other variations apart from the daytime coloring could I make?
The laptop could also be closed....
And I bet the main character would finish his sandwich or clean the room sometimes, so the sandwich could or could not be there.
I could also draw an undone bed, but I'm lazy XD;
I color everything in their own layer. I'll start with morning....
So I already have 4 versions of my room: Now, what if I have a strong light from the morning sun coming from the window?
I don't need to change many things, actually, since the light source and the light color is the same.
So I just make a new layer on top of everything else and add a light effec. I also make another layer to darken the borders of the picture to make it look nicer. 4 more versions!
And finally... what if the character leaves the curtains closed?
Now it's a bit more difficult, since the light source is behind the curtains.... but it's not impossible =P
The room should be affected by the curtain's color, so I make a new layer to do so. I add a shadow layer and a light layer and another one to adjust the brightness and sontrast of the whole thing. And tada! That's other 4 versions.
With just the morning coloring, I already have 12 versions of the same background, and without killing myself over it =P
Now I still have to do the afternnon/sunset and the night. I'll review them once I'm done =D
Hope it helps so far ^^
When drawing something, anything, USE REFERENCES!! Use your Google-fu!
Don't trust your memory, and don't blindly trust what others teach you either.
Research, observation, analysis, experimentation and practice are the key! (:
Re: Art workshop~
Nice coloring. Did I color this right?
Mujinchitai
http://lemmasoft.renai.us/forums/viewto ... =16&t=3360
Current Status: artist of R.E.M: Reality's Dream and musician, programmer, and writer of Mujinchitai
http://lemmasoft.renai.us/forums/viewto ... =16&t=3360
Current Status: artist of R.E.M: Reality's Dream and musician, programmer, and writer of Mujinchitai
- Samu-kun
- King of Moé
- Posts: 2262
- Joined: Mon Sep 03, 2007 3:49 pm
- Organization: Love in Space Inc
- Location: United States
- Contact:
Re: Art workshop~
Mmm... That's a very clever system to get the lighting done. :3 Too bad I'm reaaallllyyyy bad at drawing backgrounds. XD *keeps trying again*
- sake-bento
- Eileen-Class Veteran
- Posts: 1909
- Joined: Sat Jan 26, 2008 5:58 pm
- Completed: http://sakevisual.com/games.html
- Projects: Every Sunrise, Shinsei
- Organization: sakevisual
- Tumblr: sakevisual
- Deviantart: sakevisual
- itch: sakevisual
- Contact:
Re: Art workshop~
That is stylistically very super cool. It definitely has an atmosphere of it's own. The stars seem a little bit on the large side to me. I would imagine them to be just dots, or maybe even nonexistent. Also, if you blur the reflection in the water a little more (try a horizontal motion blur) that would probably help. But wow. That is nice.Cybeat wrote:Nice coloring. Did I color this right?
Hahaha, you and me both. Sakebe needs to level up on background making. XDSamu-kun wrote:Mmm... That's a very clever system to get the lighting done. :3 Too bad I'm reaaallllyyyy bad at drawing backgrounds. XD *keeps trying again*
sakevisual visual novels (and stuff) | sakevisual dev blog
Re: Art workshop~
Keep practicing. I got started in drawing backgrounds before drawing characters, which is why I make so many mistakes with characters now.sake-bento wrote:That is stylistically very super cool. It definitely has an atmosphere of it's own. The stars seem a little bit on the large side to me. I would imagine them to be just dots, or maybe even nonexistent. Also, if you blur the reflection in the water a little more (try a horizontal motion blur) that would probably help. But wow. That is nice.Cybeat wrote:Nice coloring. Did I color this right?
Hahaha, you and me both. Sakebe needs to level up on background making. XDSamu-kun wrote:Mmm... That's a very clever system to get the lighting done. :3 Too bad I'm reaaallllyyyy bad at drawing backgrounds. XD *keeps trying again*
Mujinchitai
http://lemmasoft.renai.us/forums/viewto ... =16&t=3360
Current Status: artist of R.E.M: Reality's Dream and musician, programmer, and writer of Mujinchitai
http://lemmasoft.renai.us/forums/viewto ... =16&t=3360
Current Status: artist of R.E.M: Reality's Dream and musician, programmer, and writer of Mujinchitai
- Deji
- Cheer Idol; Not Great at Secret Identities
- Posts: 1592
- Joined: Sat Oct 20, 2007 7:38 pm
- Projects: http://bit.ly/2lieZsA
- Organization: Sakevisual, Apple Cider, Mystery Parfait
- Tumblr: DejiNyucu
- Deviantart: DejiNyucu
- Location: Chile
- Contact:
Re: Art workshop~
*shrugs* It looks like an abstract/futuristic picture to me, so I don't think I'd be able to judge that =/Cybeat wrote:Nice coloring. Did I color this right?
But if you ever wonder "did I do this right?" you're probabñly failing at something. Try looking at photos and other pictures to see how the scene you're trying to portray looks like.
I second sake-bento on the reflection. It looks too hard and blocky, you need to blur it. Using a motion blur or liquify would be a good idea.
Also if that teal-ish circle is supposed to be a light source of sorts, you should give it an outer glow.
-------------------------------------
Now, I did a Sunset and a Night version of the bedroom =3
Sunset was pretty much coloring the image all over again with a sunset palette (orange-ish hues with violet-ish shadows).
In the end I added 3 extra layers: a brightness/contrast adjustment one, an orange one in soft light mode and some orange light coming from the window. I was too lazy to make a closed-curtains version, but it could have been achieved the same way than the morning version. Night (lights off) was the easiest and quickest. Since the light source was pretty much the same for everything, I added some layers on top of my morning version: One that turned everything to blue hues, a dark blue one in multiply mode, a brightness/contrast adjustment one and a couple more for darkening and highlighting of some parts.
I duplicated the laptop screen and brought it on top of my new adjustment layers and aded it a soft light.
tada! I skipped the "night version with bedroom lights on" because I was already tired of working on the same image all day DX; So I'll leave it for later, once I'm done with the rest of the critical BGs.
This room had pretty much only one light source, which was the window. If I ever do the "night version with bedroom lights on", I'd have to change the coloring, since the light source would be an unseen light on the ceiling, so the shadows and the overall hue of the stuff on the bedroom would be different.
------------------------------------
In the morning, the sun rises from the East. The light color is yellow and there is an overall blue-ish hue on things. If it's really early morning, there might be some orange-ish hues instead. Shadows are usually blue/violet, and the shadows casted are pretty long. the hgher the sun gets, the shorter the shadows are.
As the sun moves to the center of the sky, we get then to noon. The light is pretty much light blue, and there is a slight yellowish hue on things. Shadows tend to be of a desaturated dark red hue and the shadows casted are oftenly too short or right under the object.
The sun continues to move to the west and the light gets orange. Shadows start to get long again, but to the exact opposite direction than the morning ones. The less we see the sun, the longer the shadows are. Shadows are usualy blue/violet. There's an orange tint on things.
I found couple of pages that could be of help:
http://www.warpedspace.org/lightingT/part1.htm
http://accad.osu.edu/~fkalal/752_sp07/project1.html
Both of them deal with 3D stuff, but you can get the idea ^^
Last edited by Deji on Sun Mar 16, 2008 11:33 am, edited 1 time in total.
When drawing something, anything, USE REFERENCES!! Use your Google-fu!
Don't trust your memory, and don't blindly trust what others teach you either.
Research, observation, analysis, experimentation and practice are the key! (:
- Samu-kun
- King of Moé
- Posts: 2262
- Joined: Mon Sep 03, 2007 3:49 pm
- Organization: Love in Space Inc
- Location: United States
- Contact:
Re: Art workshop~
*drops jaws*
T-t-the utter focus on details! Sooouuugooyyy! ^_^;;
T-t-the utter focus on details! Sooouuugooyyy! ^_^;;
- Deji
- Cheer Idol; Not Great at Secret Identities
- Posts: 1592
- Joined: Sat Oct 20, 2007 7:38 pm
- Projects: http://bit.ly/2lieZsA
- Organization: Sakevisual, Apple Cider, Mystery Parfait
- Tumblr: DejiNyucu
- Deviantart: DejiNyucu
- Location: Chile
- Contact:
Re: Art workshop~
Necro-posting! XD;
Ok, I have a couple of little thingies that coud be useful for you when drawing characters =3
They're quick and messy examples, but I hope they're helpful =3
Drawing Humans: Basic
1. Sketch a basic stick-men-like figure. It'll be the structural base for the character.
Note the basic difference between the male and the female here. Men have broad shoulders and the rest of the body is pretty rectangular. Women have smaller shoulders and bigger hips, making the waist more evident. If you want to make a more feminin guy, give him less shoulders but no more hips! A more masculin girl would have wider shoulders and less evident waist.
A couple of useful proportions to remember:
- The forearm's length is the same than head + neck.
- The elbows are placed right at the waist.
- The wrists are placed around the pubis area.
Practice drawing this kind of figures in different positions! They're really useful for planning poses and illustrations in general =3
2. Add some shapes This will be the guideline for the bodyof your character.
This si the part where you add the flesh to the bones and make your structurelook more like a body... or a doll... or somehting like that.
Look at your body or at anybody else's body. It has curves. Some are slight, some are more evident. AVOID drawing straight lines when drawing the body! Look at anatomical references if you're not sure where goes what.
3. Naked body
Add the face, hair and draw how your character would look like if naked.
Again, look at referenbces if you're not sure about what goes where.
Sometimes, as in my example, the structure loos wonky when drawing the naked body... If so, then fix the things that should be fixed until your character looks like a normal person (or the type of person you wnat them to look like)
Why to draw them naked first? Because you can put the clothes on and see the shapes they should adopt and where the basic folds should be.
4. Final Add clothes and details!
If you're drawing on paper, you might want to do this step in a new piece of paper. If you're drawing in the computer, use a new layer for this.
If you have an action pose, where your characters are in motion, you might want to take an extra step before this one and sketch how the hair and clothes should be moving,
------------------------------------------------------------
Fixing a drawing, structure-wiseç
Now, what if you have a drawing (either on paper or digital) and you want to fix its structure without having to doodle all over it?
There is a simple way =D
Paper:
- Pick the piece of paper you have your drawing on and place it on a lightbox/table or on a window.
- Flip it! You should be able to see your drawing on the other side of the paper, but mirrored.
Normally, if you didn't use any structure to draw, some parts of your drawing will look weird.
- Now pick either a colored pencil or a graphite pencil and draw the structure your drawing is supposed to have. Draw some lines for guide and redraw everything that looks weird. If you're drawing with graphite, try to do it softly.
- Flip your drawing again. ou should be able to see your doodles on the other side of the paper. Now erase your drawing on the parts you fixed and redraw them over the fixing you did on the other side.
Digital:
- Flip your drawing horizontally and lower its opacity to, say... 50%.
- Make a new layer on top of it and use a light and bright color (light blue, magenta, pink or green, usually) to draw the structure, guides and redraw everything that looks weird or out of place.
- Flip horizontally both layers
- Now put the layer of your drawing on top of the one you just made in color and make it's opacity aroubd....80%
- Erase and redraw all the things you fixed when the drawing was flipped, using the color lines of your fix layer as guide.
------------------------------------
Hope it was useful! =D
When drawing something, anything, USE REFERENCES!! Use your Google-fu!
Don't trust your memory, and don't blindly trust what others teach you either.
Research, observation, analysis, experimentation and practice are the key! (:
- Samu-kun
- King of Moé
- Posts: 2262
- Joined: Mon Sep 03, 2007 3:49 pm
- Organization: Love in Space Inc
- Location: United States
- Contact:
Re: Art workshop~
Ahh... That really is clever. I've been flipping my pictures when I sketch them to fix my errors, but never after I scan it into my computer. ^_^.
- Deji
- Cheer Idol; Not Great at Secret Identities
- Posts: 1592
- Joined: Sat Oct 20, 2007 7:38 pm
- Projects: http://bit.ly/2lieZsA
- Organization: Sakevisual, Apple Cider, Mystery Parfait
- Tumblr: DejiNyucu
- Deviantart: DejiNyucu
- Location: Chile
- Contact:
Re: Art workshop~
And... new tutorial because I don't want to CG more dark/night event CGs T_T...
Overlay Coloring
This tutorial can be used in Photoshop and/or any graphic edition software that supports "Overlay" layer mode.
This is an easy way of coloring =3
It's simmilar to the Multiply layer technique, and it saves a lot of time when deciding what colors to use when shading a picture.
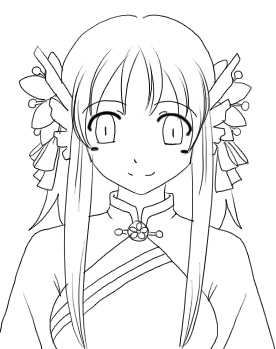
- First you need a lineart.
I linearted quickly a piece of a doodle I had on my sketchbook of a generic dragon girl from my story.
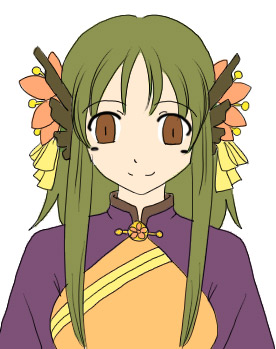
- Now you need to lay down your flat colors on a new layer, underneath your lineart.
It doesn't matter if your lineart is set to multiply or not.
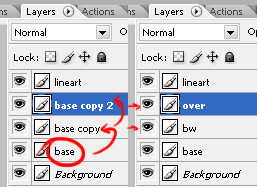
- The next thing to do is duplicate your flat colors layer TWICE.
I rename them "over" and "bw", so I know which will be used for what.
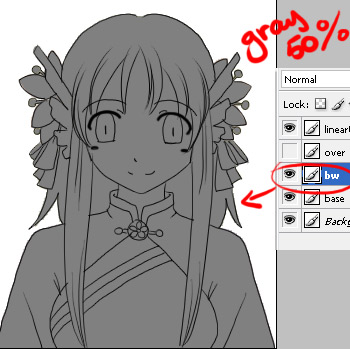
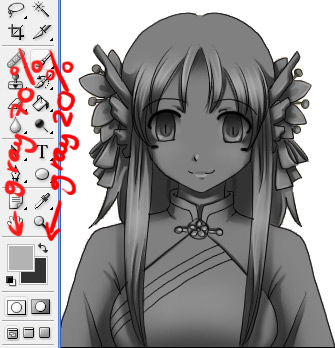
- Hide the "over" layer and paint the whole "bw" layer with 50% gray.
It's really important that it's 50% gray and not other color!
- Now pick a 20%-30% gray and shade as you normally do.
You can add some darker details with a 10% gray and highlights with 70%gray. Don't use actual black or white!
You can use the flat colors layer as a selection template to color over separate areas at a time.
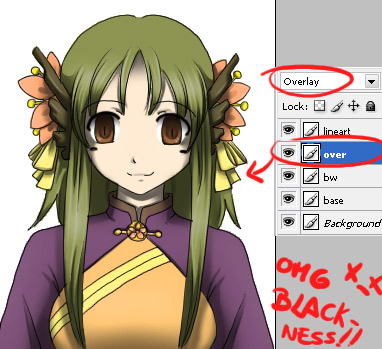
- Unhide the "over" layer and set it to "Overlay" mode.
It looks ugly XD;
- Still on the "bw" layer, open the Color Balance window (Ctrl+B).
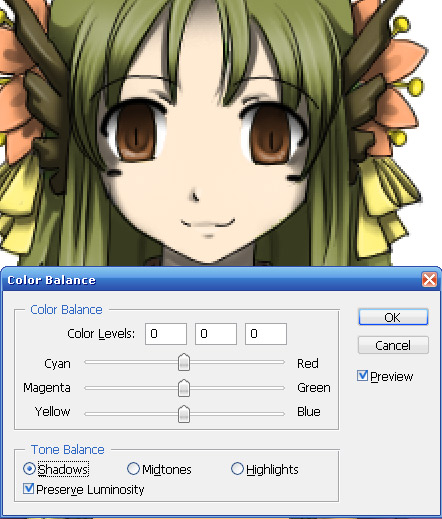
- Move the slides =D
With the color balance window, you can change the tint of the highlights, midtones and shadows of a picture.
Usually you'd want to add some yellow to the highlights and some blue to the shadows.
Play with the slides until you're happy ^^
If you hide the "over" layer again, you'll notice that you'll grayscale layer has now some tint of color.
Then add some special efefects or whatever you want to add and it's done =D
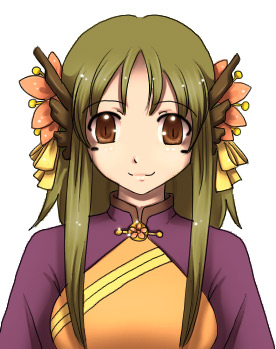
What's so good about this method?
- Just like the multiply method, you add the same amount of shadows and highlights to every part fo the picture, thing that's harder when you choose the shading colors by hand.
- Another good thing is that you don't need to worry about coloring over another part of the picture that has a different color when shading XD; you just shade everything! The color comes afterward ^^ It's also good when shading areas that have lots of different colors, like a fabric with a pattern. (just like with the ultiply method)
- You can add highlights and shadows, unlike the multiply method =3
- Also, when coloring in grayscale, you have a better idea of the lights on the whole picture, and you can easily make tests and change the light source if you want, since you're using 2-4 four actual colors to paint, instead of a whole palette.
Overlay Coloring
This tutorial can be used in Photoshop and/or any graphic edition software that supports "Overlay" layer mode.
This is an easy way of coloring =3
It's simmilar to the Multiply layer technique, and it saves a lot of time when deciding what colors to use when shading a picture.
- First you need a lineart.
I linearted quickly a piece of a doodle I had on my sketchbook of a generic dragon girl from my story.

- Now you need to lay down your flat colors on a new layer, underneath your lineart.
It doesn't matter if your lineart is set to multiply or not.

- The next thing to do is duplicate your flat colors layer TWICE.
I rename them "over" and "bw", so I know which will be used for what.

- Hide the "over" layer and paint the whole "bw" layer with 50% gray.
It's really important that it's 50% gray and not other color!

- Now pick a 20%-30% gray and shade as you normally do.
You can add some darker details with a 10% gray and highlights with 70%gray. Don't use actual black or white!
You can use the flat colors layer as a selection template to color over separate areas at a time.

- Unhide the "over" layer and set it to "Overlay" mode.
It looks ugly XD;

- Still on the "bw" layer, open the Color Balance window (Ctrl+B).

- Move the slides =D
With the color balance window, you can change the tint of the highlights, midtones and shadows of a picture.
Usually you'd want to add some yellow to the highlights and some blue to the shadows.
Play with the slides until you're happy ^^
If you hide the "over" layer again, you'll notice that you'll grayscale layer has now some tint of color.
Then add some special efefects or whatever you want to add and it's done =D

What's so good about this method?
- Just like the multiply method, you add the same amount of shadows and highlights to every part fo the picture, thing that's harder when you choose the shading colors by hand.
- Another good thing is that you don't need to worry about coloring over another part of the picture that has a different color when shading XD; you just shade everything! The color comes afterward ^^ It's also good when shading areas that have lots of different colors, like a fabric with a pattern. (just like with the ultiply method)
- You can add highlights and shadows, unlike the multiply method =3
- Also, when coloring in grayscale, you have a better idea of the lights on the whole picture, and you can easily make tests and change the light source if you want, since you're using 2-4 four actual colors to paint, instead of a whole palette.
Last edited by Deji on Tue Mar 18, 2008 10:29 am, edited 1 time in total.
When drawing something, anything, USE REFERENCES!! Use your Google-fu!
Don't trust your memory, and don't blindly trust what others teach you either.
Research, observation, analysis, experimentation and practice are the key! (:
- Vatina
- Miko-Class Veteran
- Posts: 862
- Joined: Mon May 08, 2006 2:49 am
- Completed: Blue Rose, AO: Broken Memories, My Eternal Rival, Dust
- Projects: AO: Fallen Star
- Organization: White Cat
- IRC Nick: Vatina
- Tumblr: vatinyan
- Deviantart: Vatina
- itch: whitecat
- Contact:
Re: Art workshop~
I already knew about the "mirror the image to find the flaws" trick, but somehow I had never thought about drawing on the other side of the paper. That's a really great idea, I'll try it out ^^
The colouring tip looks really smart too - I have to check if I can do that in my program now :3
Thanks a lot for all the help you give in this thread. A lot of these ideas I never see in all the other tutorials I find.....
The colouring tip looks really smart too - I have to check if I can do that in my program now :3
Thanks a lot for all the help you give in this thread. A lot of these ideas I never see in all the other tutorials I find.....
-
lordcloudx
- Eileen-Class Veteran
- Posts: 1406
- Joined: Fri Feb 17, 2006 12:47 pm
- Completed: http://rd2k2-games.blogspot.com
Re: Art workshop~
Thanks for the anatomy tips. The info about the placement of the elbow and wrists is really useful.
How do you make your games? I see. Thank you for the prompt replies, but it is my considered opinion that you're doing it wrong inefficiently because I am a perfushenal professional. Do it my way this way and we can all ascend VN Nirvana together while allowing me to stroke my ego you will improve much faster. Also, please don't forget to thank me for this constructive critique or I will cry and bore you to death respond appropriately with a tl;dr rant discourse of epic adequately lengthy proportions. - Sarcasm Veiled in Euphemism: Secrets of Forum Civility by lordcloudx (Coming soon to an online ebook near you.)
-
RidleyWright
- Regular
- Posts: 106
- Joined: Mon Feb 18, 2008 7:23 pm
- Projects: Blue Moon
- Location: Portugal
- Contact:
Re: Art workshop~
I already gave this method a shot this morning, and yeah, it suits my noobness better, since I don't have to hand pick color to shade. The result wasn't too bad I guess. Anyway, thanks for the tips.
P.S.: Always wanted to draw simple stick figures without having to do cilinders. Great tutorials! xD
P.S.: Always wanted to draw simple stick figures without having to do cilinders. Great tutorials! xD
-
Nebi
- Regular
- Posts: 104
- Joined: Wed Feb 20, 2008 12:43 am
- Projects: Greaves
- Location: Outer Space
- Contact:
Re: Art workshop~
This thread is a wonderful contribution to the community. Thank you, Deji - lovely work.
Much respect. :D
Much respect. :D
Who is online
Users browsing this forum: Ahrefs [Bot]
