Mugenjohncel's Quick, Dirty and Cheap Tutorials

Use this forum to help develop your game-making skills, and get feedback on writing, art, music, or anything else you've created that isn't attached to a game in progress.
Message
Author
User avatar
mugenjohncel
Hentai Poofter
Posts: 2121
Joined: Sat Feb 04, 2006 11:13 pm
Organization: Studio Mugenjohncel
Location: Philippines
Contact:

Mugenjohncel's Quick, Dirty and Cheap Tutorials

#1 Post by mugenjohncel »

Let's see... I now present you my first tutorial... enjoy (runs and hides from the incoming shitstorm... HAHAHAHAHA!!! :twisted: )

Image
Image
Image
Image
Image
Image
Image
Image
Image

Anyway, this is not your perfect tutorial, just sharing my way of creating BG's fast, easy and cheap! Hope this helps...

"POOF" (Disappears)

Edit:
Also, I added the file in case anyone wanted to take a peek at how it looks like in photoshop... and maybe play a bit with it.

http://www.sendspace.com/file/h1z5ss

User avatar
Samu-kun
King of Moé
Posts: 2262
Joined: Mon Sep 03, 2007 3:49 pm
Organization: Love in Space Inc
Location: United States
Contact:

Re: Mugenjohncel's Quick, Dirty and Cheap Tutorials

#2 Post by Samu-kun »

*face palm*

And here I thought you were actually a half decent background artist! I should have known the likes of you would find some cheap round-a-bout way to make backgrounds so quickly!

Ren

Re: Mugenjohncel's Quick, Dirty and Cheap Tutorials

#3 Post by Ren »

<3

Thanks very much for the tutorial!

Jake
Support Hero
Posts: 3826
Joined: Sat Jun 17, 2006 7:28 pm
Contact:

Re: Mugenjohncel's Quick, Dirty and Cheap Tutorials

#4 Post by Jake »

Ren wrote: Thanks very much for the tutorial!
Ditto. I'd add a couple of things, mostly for the benefit of others (since I gather Mugen knows at least most of them already):

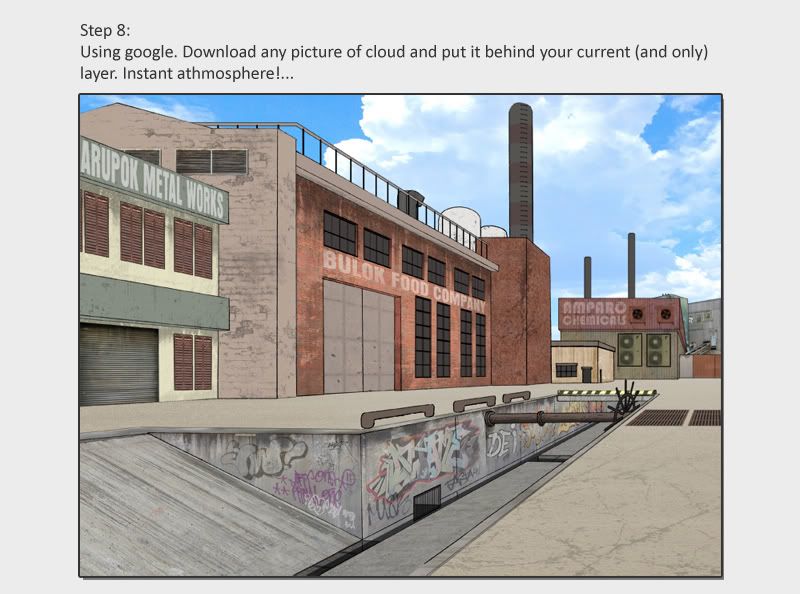
- If you can find a picture of a landscape that has a lot of sky, it'll often make a better bottom-layer background than a clouds shot, because clouds are usually photographed looking upwards at a much steeper angle than they'd appear using this technique, so you'll avoid the "sky looks really really close" effect you sometimes see in collage BGs like this.

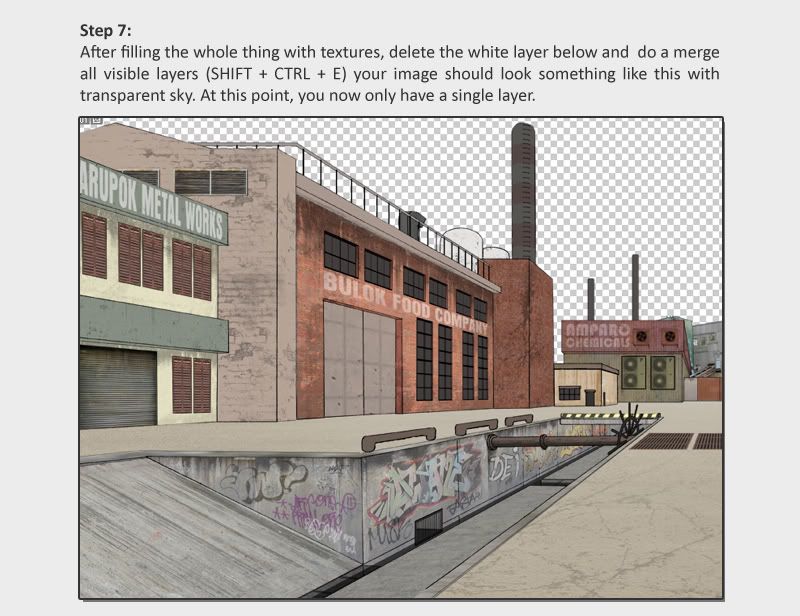
- It's probably a good idea to hand-select the whole area that shouldn't be sky, and fill it with some neutral colour (dark blue-grey would probably work for the tutorial example image) so that if you've not been perfect lining up the textures, you don't get random pixels of sky showing through

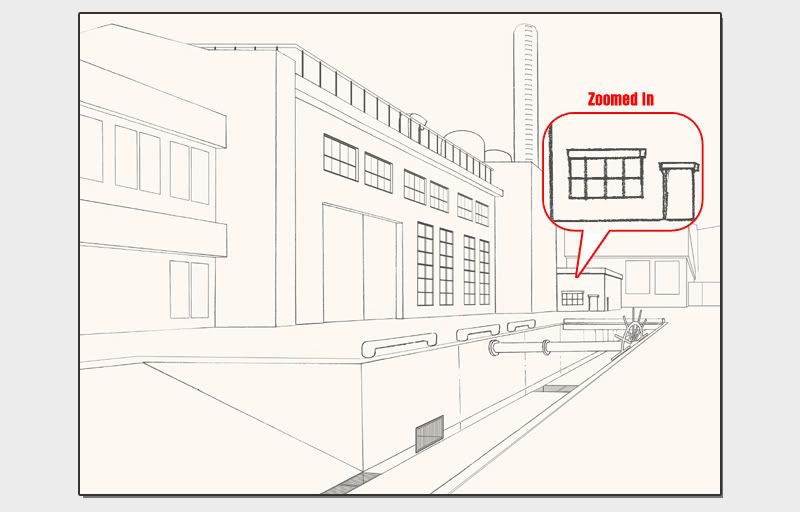
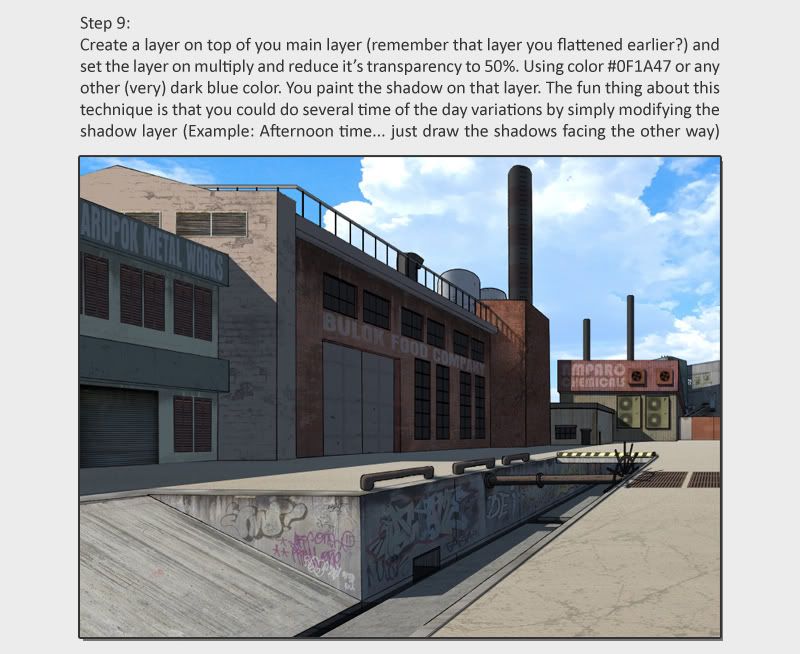
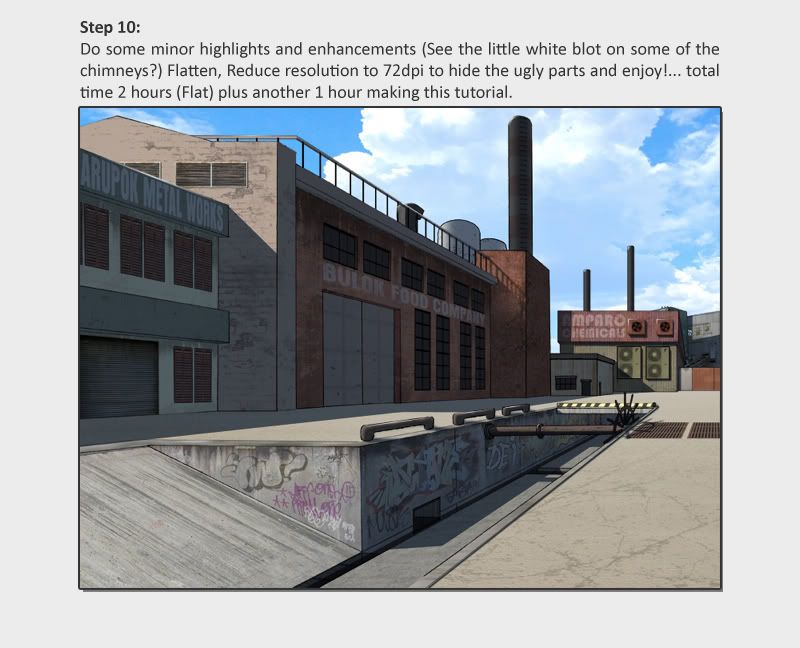
- When drawing your BG, it's generally a good idea to always put something in the way of the vanishing point (or all your vanishing points, if you're using multiple-point perspective). In this example, the vanishing point seems to be either just off-screen to the right (which is just as good), or maybe behind the orange wall/fence. If the viewer can see all the way to the vanishing point then you'll have to be very, very careful about foreshortening and compression of depth and all those other things that it's a lot easier to just not worry about - and it's very rare to actually see a view that goes all the way to the vanishing point in real life (unless you're in the middle of the ocean) so it looks kind of unnatural.

- If you're drawing BGs for a VN, then remember that the horizon sits at the viewer's eye-level at all times. If the viewer is supposed to be shorter than everyone else, then have the horizon low on the screen; if they're taller, have a horizon very close to the top of the screen. Usually, though, you'll want the horizon to be around the eye-level of other characters, because usually your protagonist will be about the same height as most of the other characters.
Server error: user 'Jake' not found

Adorya
Miko-Class Veteran
Posts: 541
Joined: Fri Aug 18, 2006 4:51 pm
Contact:

Re: Mugenjohncel's Quick, Dirty and Cheap Tutorials

#5 Post by Adorya »

Step 2 is the hardest part of this "quick" tutorial...you will need some good or pro drawing table for perspective drawing, a horizontal one is hell to manage with rulers and so... :evil:

KimiYoriBaka
Miko-Class Veteran
Posts: 636
Joined: Thu May 14, 2009 8:15 pm
Projects: Castle of Arhannia
Contact:

Re: Mugenjohncel's Quick, Dirty and Cheap Tutorials

#6 Post by KimiYoriBaka »

This was quite informative. I figured you had to have used photoshop, but I wasn't sure how much so. Kinda depressing, though, seeing the step that uses a ruler. I have a personal vendetta against rulers...

My scanner has a default setting of 300 dpi. Would changing that make much of a difference?

Jake
Support Hero
Posts: 3826
Joined: Sat Jun 17, 2006 7:28 pm
Contact:

Re: Mugenjohncel's Quick, Dirty and Cheap Tutorials

#7 Post by Jake »

KimiYoriBaka wrote: Kinda depressing, though, seeing the step that uses a ruler. I have a personal vendetta against rulers...
You're welcome to use a set-square or a straight-edge or a t-square instead... :3
KimiYoriBaka wrote: My scanner has a default setting of 300 dpi. Would changing that make much of a difference?
No. Realistically, your final image is probably going to get displayed on screen at ~50dpi anyway, the important thing is just that you scan it at a much higher resolution so you can shrink it by a significant percentage so that your pencil lines look cleaner and detail looks finer.
Server error: user 'Jake' not found

dstarsboy
Veteran
Posts: 461
Joined: Mon Apr 27, 2009 4:58 pm
Location: Phoenix
Contact:

Re: Mugenjohncel's Quick, Dirty and Cheap Tutorials

#8 Post by dstarsboy »

I'm a big fan of Mugenjohncel's stuff. I always thought he used a 3d modeler for his backgrounds, but it's cool to know that it's easier than that. I find it hard to believe he did this in 2 hours though... the sheer mechanics of it make it seem unlikely.

Anyways, I'm glad to see this tutorial, it's extremely helpful.
Current Projects:
The Isle of St Marcus

ebonyskies
Regular
Posts: 67
Joined: Tue Jun 30, 2009 5:20 pm
Projects: Visit to Nowhere (WIP) and Pet Project--Cat Girl
Contact:

Re: Mugenjohncel's Quick, Dirty and Cheap Tutorials

#9 Post by ebonyskies »

This is ridiculously helpful. XD Although really, I'd probably need a decent amount of help with the actually drawing part. <_< I suppose that's were reference photos help a bunch.
Currently in the pre-production stages of creating the VN Visit to Nowhere, a moderately dark modern fairytale. In progress thread will be created once out of the pre-production phase. =D

Plotting: 25%
Concept art: 80%
Demo: 50%

Jake
Support Hero
Posts: 3826
Joined: Sat Jun 17, 2006 7:28 pm
Contact:

Re: Mugenjohncel's Quick, Dirty and Cheap Tutorials

#10 Post by Jake »

dstarsboy wrote:I always thought he used a 3d modeler for his backgrounds, but it's cool to know that it's easier than that.
Aha - hahahaha haha!

Seriously, drawing well in perspective is not what one would describe as 'easy'. You need to remember fewer keyboard shortcuts than using a 3D modeller, need less software help and learning the technical parts may be quicker, but it requires a lot more actual skill than producing the same scene in a 3D modeller. Or you could go for the mathematical-precision approach and it needs more learning than the 3D modeller as well!

Although I guess on the up side, it's probably more feasible to get almost-there-but-still-not-quite-right on paper than in a modeller.
Server error: user 'Jake' not found

User avatar
MaiMai
Yandere
Posts: 1757
Joined: Sat Mar 21, 2009 6:04 pm
Completed: [Phase Shift]
Projects: [ None ]
Organization: Paper Stars
Tumblr: maiscribbles
Deviantart: maiscribble
Location: USA, Southern California
Contact:

Re: Mugenjohncel's Quick, Dirty and Cheap Tutorials

#11 Post by MaiMai »

Oh awesome. Definitely going to put this to use. But gotta work on my perspective first :B
Image COMMISSIONS AVAILABLE (check Tumblr sidebar)

adrix89
Regular
Posts: 72
Joined: Fri Jun 26, 2009 12:15 pm
Contact:

Re: Mugenjohncel's Quick, Dirty and Cheap Tutorials

#12 Post by adrix89 »

Although I guess on the up side, it's probably more feasible to get almost-there-but-still-not-quite-right on paper than in a modeller.
I disagree the moment when you hit LIGHTS part in the 3d rendering you can get the almost-but-never-right-anywhere
Coincidently this is the part where I'm bashing my head against the wall
Also if you model it wrong or quirky or your perspective is wrong its much worse, paper is faster as it is it comes with a eraser or another page right besides you
My recommendation is paper is fast so never look back
That is if you don't want to do strange things like panorama

V2Blast
Regular
Posts: 153
Joined: Sun May 31, 2009 3:01 am
Contact:

Re: Mugenjohncel's Quick, Dirty and Cheap Tutorials

#13 Post by V2Blast »

I'm not going to be using this tutorial, but it's awesome to those who can't get decent backgrounds for their VNs. :P
Pie is delicious.

Jake
Support Hero
Posts: 3826
Joined: Sat Jun 17, 2006 7:28 pm
Contact:

Re: Mugenjohncel's Quick, Dirty and Cheap Tutorials

#14 Post by Jake »

adrix89 wrote:
Although I guess on the up side, it's probably more feasible to get almost-there-but-still-not-quite-right on paper than in a modeller.
I disagree the moment when you hit LIGHTS part in the 3d rendering you can get the almost-but-never-right-anywhere
Getting to the bit where you hit the lights already involves knowing how to use the 3d program and modelling everything, though. Whereas you can get almost-there on paper by just looking at a scene and drawing what you see, in the simplest case. It's probably not going to be perfect unless you also understand how perspective works, but it's not tricky.

And you need to understand how the shapes work to do perspective right on paper, so you can't avoid modelling things 'quirky' on paper, either.
Server error: user 'Jake' not found

Adorya
Miko-Class Veteran
Posts: 541
Joined: Fri Aug 18, 2006 4:51 pm
Contact:

Re: Mugenjohncel's Quick, Dirty and Cheap Tutorials

#15 Post by Adorya »

I also would like to know how much time was taken to do the step 2 in the whole process, because if the whole process is around 3h max mugen is a god in drawing perspective even with drawing a transparent sheet upside the original photo.

I had a perspective class during one year of architectural course and I can say you need a lot of methodology and self conscientiousness in order to make a clean rough of that kind of view, especially if you draw something in A3+ format (and I don't talk about A0 format, which is the basic but can't fit in a A3 scanner). AND he made a f**king zoom to show that his lineart was very clean (usually you can see lot of unclean rubbered area because sometimes you can miss a line with your f**king ruler moving by accident).

I'd say 30-1h if you are very good at drawing perspective or copying with a transparent sheet, another 30 min for scanning/cleaning the draft and x hours for looking for the right render/light/composition.

Locked

Who is online

Users browsing this forum: No registered users