Edit 02/07/2022: I've revamped the function, added examples, and a link to download a plug and play .rpy file. This function is for the classic way of displaying images.
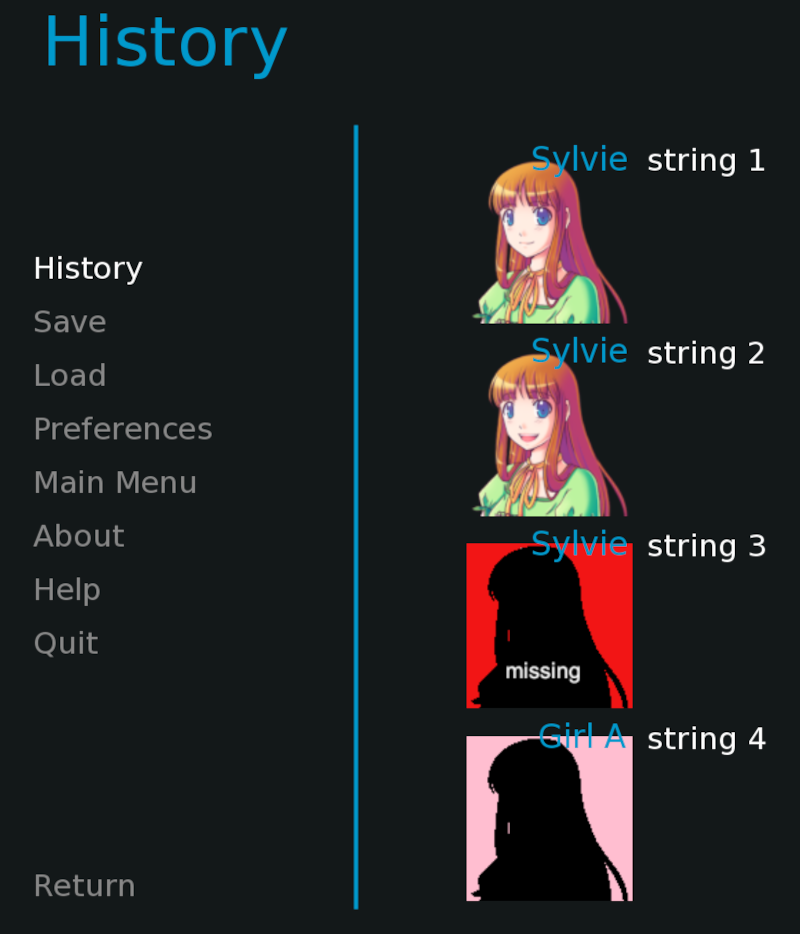
Hello, I bring you a script that you are going to love, with which you can add images to the dialog history, these images correspond to the expression of the character shown in that dialog. This post you can also learn how to modify the history screen with features that do not come in Ren'Py.I share this script with you because I appreciate the community of creators of visual novels, I have learned a lot from it. And now it's time for me to share something you can use this script just remember to give me credit. I also want to thank PyTom who gave me guidance on what to do. without further ado let's start with the explanation. I have put the procedure in blue letters and the explanation remains in black.
As a first step we have to add the image property to our characters, this is so that Ren'Py relates our character object with an image tag. here is an example.
Code: Select all
define e = Character("Eileen", image="eileen")In this part I could not move forward, I had an idea of what I had to do but my approach was wrong, the only thing I managed was to get the last image shown repeatedly. So I asked PyTom what I should do, he told me that I had to use the configuration variable config.history_callbacks, I developed the rest alone.
Let's continue with the procedure, what follows is to add a callable(a function) to the configuration variable config.history_callbacks
download it from:
https://github.com/Moshibit/portraits-f ... -in-RenPy-
Uncomment one of the last two lines depending on the type of images you use in your project
This function uses the side images of the characters, if you don't want to use the side images because they are not suitable for your history screen, you will have to use this function as an example and create your own and get similar result, just make sure that entry. image is a string, notice that the string I store is for images that are in the images folder, if your images are outside the caprta images you will have to add to the string the address and the extension of your image.
Then we add the invocalbe to config.history_callbacks, this variable is actually a list, so we have to use the append method.
I will explain again what happens, when when creating a HystoryEntry object it is passed as the first parameter to each callable in the list in config.history_callbacks. the function investigates which image we are showing from the image tag that is stored in the HistoryEntry object as a new property.
Then add a folder with your portraits to the gui folder.
Finally, you have to modify the history screen. This is the simplest part, in the Ren'Py default screen you have to put the following in the window statement and after has fixed: yfit True statement :
Code: Select all
add h.image:
    xalign 0.05 yalign 0.7
That's it all, I will do my best to write this post, sorry if I wrote something wrong, English is not my native language, I speak Spanish, I have studied English but you can always make mistakes, If something is wrong, tell me to correct it,I appreciate your comments and feedbacks.
It is not mandatory but if the code is useful I would appreciate it if you give me credit. See you next time.
References:
https://www.renpy.org/doc/html/dialogue.html#Character
https://www.renpy.org/doc/html/displayi ... html#image
https://www.renpy.org/doc/html/history. ... storyentry
https://www.renpy.org/doc/html/config.html
https://www.renpy.org/doc/html/side_image.html