[solved] Advanced Transition

Discuss how to use the Ren'Py engine to create visual novels and story-based games. New releases are announced in this section.
Forum rules
This is the right place for Ren'Py help. Please ask one question per thread, use a descriptive subject like 'NotFound error in option.rpy' , and include all the relevant information - especially any relevant code and traceback messages. Use the code tag to format scripts.
Post Reply
Message
Author
User avatar
Kaen
Regular
Posts: 148
Joined: Tue Oct 16, 2012 10:49 pm
Contact:

[solved] Advanced Transition

#1 Post by Kaen »

Hello everyone.

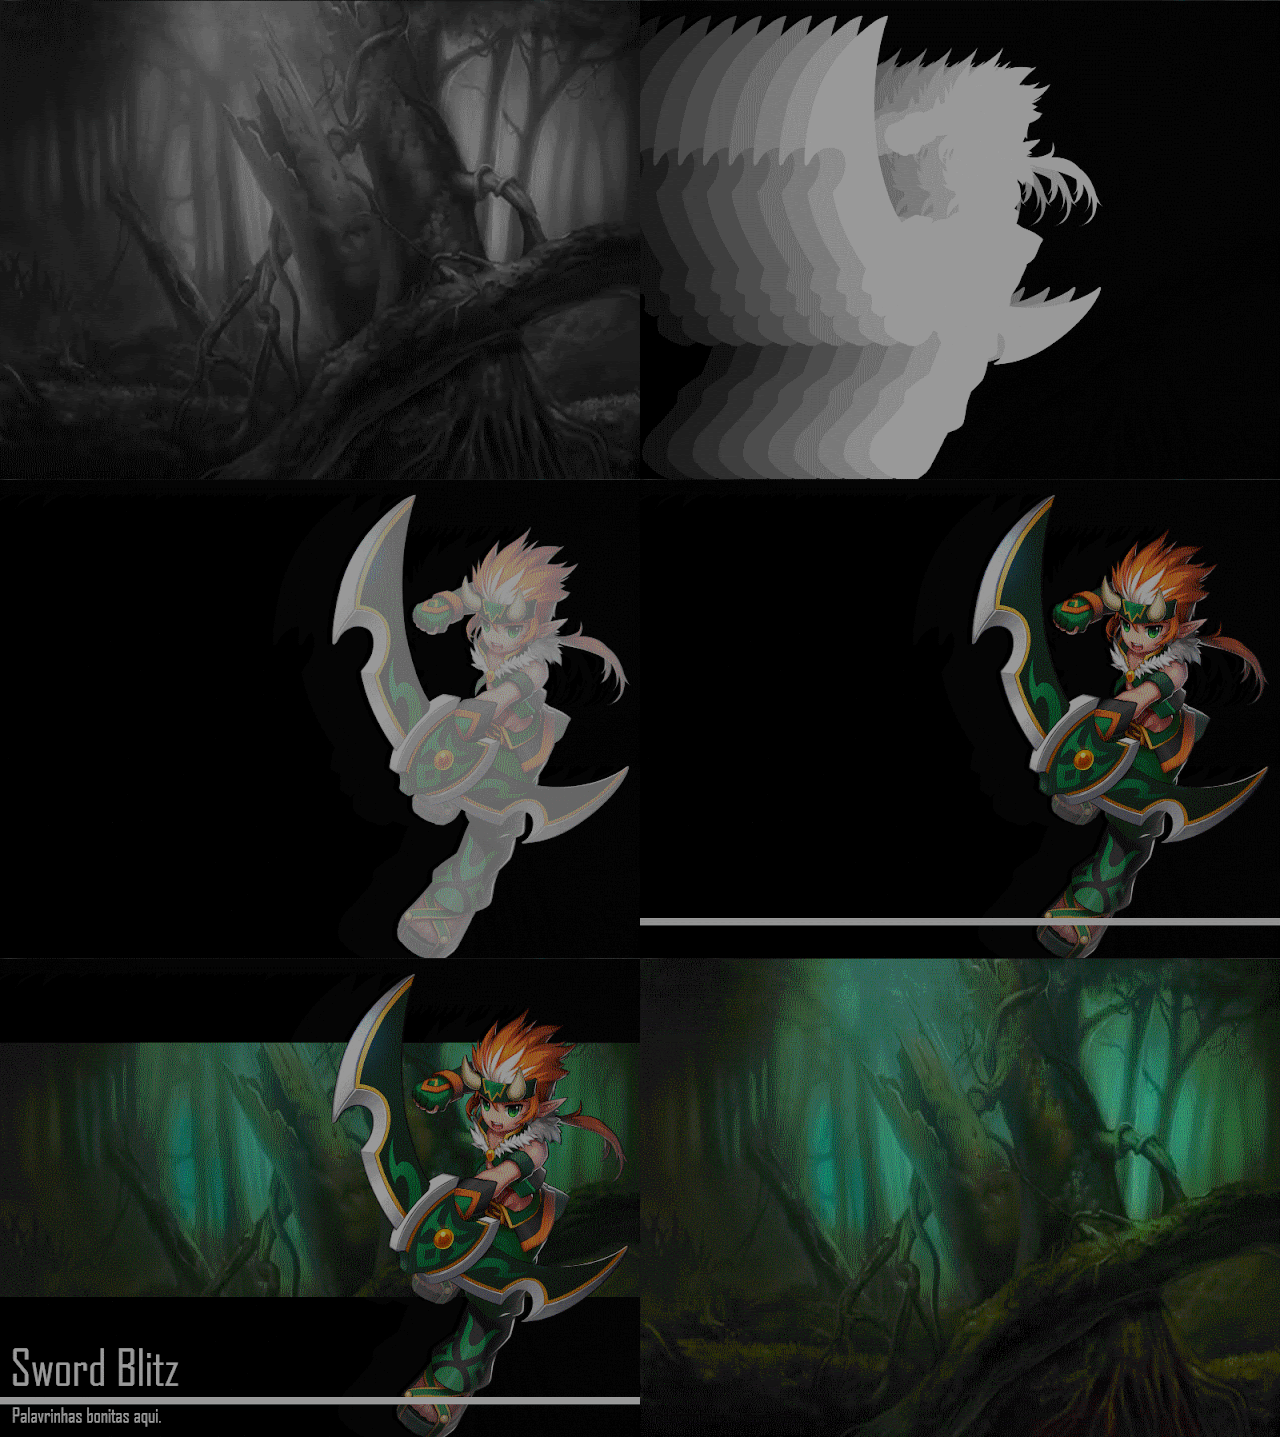
I'd like to know if it's possible and how to make a transition like this one:
Image

It doesn't need to be exactly like the example above, anything near it would be awesome.

Thanks! :)
Last edited by Kaen on Wed May 21, 2014 10:16 pm, edited 1 time in total.

User avatar
PyTom
Ren'Py Creator
Posts: 16096
Joined: Mon Feb 02, 2004 10:58 am
Completed: Moonlight Walks
Projects: Ren'Py
IRC Nick: renpytom
Github: renpytom
itch: renpytom
Location: Kings Park, NY
Contact:

Re: Advanced Transition

#2 Post by PyTom »

I think this is doable. You'd want to use a mix of imagedissolve, slideright, and dissolve transitions to pull this sequence off, but I think the basic building blocks are there. It's hard to talk about how to code it without sprites and a clear idea of what the start of the loop is.
Supporting creators since 2004
(When was the last time you backed up your game?)
"Do good work." - Virgil Ivan "Gus" Grissom
Software > Drama • https://www.patreon.com/renpytom

User avatar
Kaen
Regular
Posts: 148
Joined: Tue Oct 16, 2012 10:49 pm
Contact:

Re: Advanced Transition

#3 Post by Kaen »

Yay I'm glad this is doable XD

I'll test the transition using this sprite.

The loop starts with the slideright transition and ends when the sprite fades.

The right way to implement this is calling one transition after the other?

Thanks! (:

User avatar
PyTom
Ren'Py Creator
Posts: 16096
Joined: Mon Feb 02, 2004 10:58 am
Completed: Moonlight Walks
Projects: Ren'Py
IRC Nick: renpytom
Github: renpytom
itch: renpytom
Location: Kings Park, NY
Contact:

Re: Advanced Transition

#4 Post by PyTom »

That's a reasonable way, I think.

I'm thinking a way to do it would be:

slideright the dark gray-gray-white character image
dissolve to the white character image
dissolve to the color character image
imagedissolve to the full image
imagedissolve to black
Supporting creators since 2004
(When was the last time you backed up your game?)
"Do good work." - Virgil Ivan "Gus" Grissom
Software > Drama • https://www.patreon.com/renpytom

Asceai
Eileen-Class Veteran
Posts: 1258
Joined: Fri Sep 21, 2007 7:13 am
Projects: a battle engine
Contact:

Re: Advanced Transition

#5 Post by Asceai »

Let's b-b-break it down.
tr1.jpg
Okay, first off, the background starts out quite bright, suggesting this isn't actually the start of the transition, although it is the start of this .GIF. Anyway you can create a brighter version of an image with an appropriate matrix, such as im.matrix.brightness and dissolve to it. That part is easy.

Now, the image fades to a darker version and then to black- im.matrix.brightness is suitable here too. However, that effect with the background being pushed off to the side in a randomly staggered fashion is not something ren'py can do. You might be able to fake a similar effect by having multiple CropMove transitions and some complicated mess of AlphaDissolves but you would never get it exactly. It's an ugly effect in most situations and this is one of the few examples where it actually looks decent, so it's not a huge loss that this isn't in ren'py. You could manage something that looks about as good with a fade to a darker version of the background coupled with an ImageDissolve (using noise as the control image) and slideawayleft or something like that, probably. Either way, the screen goes black by the end of this portion.
tr2.jpg
Here, the sprite, white and with progressively darker shadows trailing slides in from the left. It's very easy to make a sprite completely white. You can use im.matrix.brightness again with a value of 1. For a live approach, you could use AlphaBlend (control=the sprite, old='#0000', new='#FFF', alpha=True), or you could just have a completely white version of the sprite, whatever. Now, you need to animate that sprite coming in. I'd actually recommend creating a new layer or something to do this on so that you can do it while other transitions are happening behind it, because some more transitions are coming up. In fact, I wouldn't do this specific part with a transition at all. Moving a sprite across the screen is the easiest thing ever with ATL. Now, there isn't just one sprite here, there's 5 of them. The darker versions are actually slightly bluer than the main sprite. Up to you if that's important or not. Now, at first I couldn't tell if the other versions were simply darker or were more transparent, but no, they're darker and fully opaque - this is because the brighter ones cover the darker ones entirely and there is no blending taking place. Creating darker version of the white form of the sprite is again easy- you could blend with the right colours, use another matrix, whatever. Just give them ATL as well and have them move in from off the screen to the final position, each one progressively offset to the left. Remember to 'show' the darker ones first so the lighter ones end up on top. Next, all but the brightest one need to fade away quickly after reaching the final position- alpha isn't really appropriate here, but could do in a pinch.
tr3.jpg
Here, the white form of the sprite fades into the standard form. Here transitions start happening behind it, so it's a good thing we're working on a separate layer. You could either do this by showing the coloured form of the sprite over the white form and just having it fade in, then vanishing the white form really quick. This can sometimes cause issues with the partially-transparent antialiasing pixels at the edge of the sprite though, which will be less transparent (and therefore look different)- this could potentially be fixed by making the white form of the sprite slightly larger than the standard form. Alternatively you could use AlphaBlend here too, with 'control' being an ATL image fading from fully transparent to fully opaque, old being the white form of the sprite and new being the coloured form. There's a few possible solutions, actually.

Now, behind it. the background is fading back in, again to a darker form (so im.matrix.brightness again) with black bars on the top and bottom- this could just be one image drawn on top of the background. There's also a line scrolling in - for now, let's just make that line a sprite and ATL to bring it across.
tr4.jpg
The sprite is still fading from white and the background is still fading in, but we have another effect, the 'Sword Blitz' text appearing. This is another transition, and a simple one- it's just ImageDissolve with bars of random brightness. Too easy. It might need to happen on a separate layer, but that's not a big deal- note that it's not necessary to use separate layers for all these things, it just simplifies certain things somewhat.
tr5.jpg
Here, the subtitle or description or whatever comes in, appearing left to right. Also too easy. I believe this is the wiperight transition (you can do this with CropMove to get better control over speed etc.)
tr6.jpg
Now, we fade everything in to the original background again. The transition used here is obvious- it's ImageDissolve, but I'm not precisely sure what the control image used is. It appears to be two sets of blinds, one a vertically flipped version of the other, on top of each other, but this is something you'd play around with.

User avatar
Kaen
Regular
Posts: 148
Joined: Tue Oct 16, 2012 10:49 pm
Contact:

Re: Advanced Transition

#6 Post by Kaen »

OMG! Thank you so much Asceai for such detailed explanation and also PyTom for replying. You guys helped me a lot.

There's still a couple of things I need to figure out:

• How can I make just part of a image to move? I tried using CropMove as suggested but I could only move the entire image.

• On the final transition with blinds, I need to use them twice, one being a vertically flipped version of the other? How can I call both transitions at the same time?

So far that's what I could make:

Image

Asceai
Eileen-Class Veteran
Posts: 1258
Joined: Fri Sep 21, 2007 7:13 am
Projects: a battle engine
Contact:

Re: Advanced Transition

#7 Post by Asceai »

That already looks pretty great.
• How can I make just part of a image to move? I tried using CropMove as suggested but I could only move the entire image.
You could potentially do stuff on another layer and CropMove that, but CropMove always affects the entire image.

If this is for the text, you could try ImageDissolve with a carefully designed image to first transition in the line, then the name, then the description.
• The final transition with blinds, I need to use them twice, one being a vertically flipped version of the other? How can I call both transitions at the same time?
Blinds is basically just an ImageDissolve effect with a tiled gradient, so I basically meant just doing ImageDissolve with an image along those lines. I'm not exactly sure what the effect used there is, but my guess would be something like this:
imagedissolve.png
imagedissolve.png (3.36 KiB) Viewed 2501 times

User avatar
Kaen
Regular
Posts: 148
Joined: Tue Oct 16, 2012 10:49 pm
Contact:

Re: Advanced Transition

#8 Post by Kaen »

Yay Asceai such fast and usefull reply again thank you TwT!

The image you provided to work with blinds worked perfectly!

When I mentioned the CropMove I was talking about this:
Asceai wrote:However, that effect with the background being pushed off to the side in a randomly staggered fashion is not something ren'py can do. You might be able to fake a similar effect by having multiple CropMove transitions and some complicated mess of AlphaDissolves but you would never get it exactly.
So, I wanted to try to move separate pieces of the background to make this sequence:

Image

Asceai
Eileen-Class Veteran
Posts: 1258
Joined: Fri Sep 21, 2007 7:13 am
Projects: a battle engine
Contact:

Re: Advanced Transition

#9 Post by Asceai »

Kaen wrote:When I mentioned the CropMove I was talking about this:
Asceai wrote:However, that effect with the background being pushed off to the side in a randomly staggered fashion is not something ren'py can do. You might be able to fake a similar effect by having multiple CropMove transitions and some complicated mess of AlphaDissolves but you would never get it exactly.
So, I wanted to try to move separate pieces of the background to make this sequence:

Image
Ah, right. I actually meant having CropMove move the entire image, but at several different speeds in different transitions and then mashing the transitions together. Basically, you can run a transition without actually showing it because a transition is just something you call with new and old images and you then get a displayable (Transitions and Python), which can be piped into AlphaDissolve or a displayable or something else. I also think it would be really slow.

Here's another, more authentic possibility, though:
- Split the image up into lots of vertical rows using im.Crop. I wouldn't recommend one per pixel, but maybe with 10-pixel rows?
- Create an ATL transform to move a row offscreen, e.g:

Code: Select all

transform shift_row(t):
    xanchor 0.0 xpos 0.0
    linear t xpos -1.0
- Show all of the rows at their correct positions, each one with 'at shift_row(n)' where n is a random value within some range.

User avatar
Kaen
Regular
Posts: 148
Joined: Tue Oct 16, 2012 10:49 pm
Contact:

Re: Advanced Transition

#10 Post by Kaen »

I used im.Crop and sliced a 800x600 image (the game's screen resolution) on 10 pieces of 800x60:

Code: Select all

image bg01 = im.Crop("image/bg color.png", (0, 540, 800, 60))
image bg02 = im.Crop("image/bg color.png", (0, 480, 800, 60))
image bg03 = im.Crop("image/bg color.png", (0, 420, 800, 60))
image bg04 = im.Crop("image/bg color.png", (0, 360, 800, 60))
image bg05 = im.Crop("image/bg color.png", (0, 300, 800, 60))
image bg06 = im.Crop("image/bg color.png", (0, 240, 800, 60))
image bg07 = im.Crop("image/bg color.png", (0, 180, 800, 60))
image bg08 = im.Crop("image/bg color.png", (0, 120, 800, 60))
image bg09 = im.Crop("image/bg color.png", (0, 60, 800, 60))
image bg10 = im.Crop("image/bg color.png", (0, 0, 800, 60))
Then I used the shift_row transform to show the images, but they didn't move at all:

Code: Select all

show bg01 at shift_row(1):
    yalign 0.1 xalign 0
pause 0.3    
show bg02 at shift_row(2):
    yalign 0.2 xalign 0
pause 0.3
show bg03 at shift_row(3):
    yalign 0.3 xalign 0
...
I also tried this but the images didn't move as well:

Code: Select all

show bg01 at shift_row(1)
pause 1
show bg02 at shift_row(2)
pause 1
show bg03 at shift_row(3)
...
I think the problem is that the images I'm trying to move are the same width as the screen's resolution?

Asceai
Eileen-Class Veteran
Posts: 1258
Joined: Fri Sep 21, 2007 7:13 am
Projects: a battle engine
Contact:

Re: Advanced Transition

#11 Post by Asceai »

Kaen wrote:Then I used the shift_row transform to show the images, but they didn't move at all:

Code: Select all

show bg01 at shift_row(1):
    yalign 0.1 xalign 0
pause 0.3    
show bg02 at shift_row(2):
    yalign 0.2 xalign 0
pause 0.3
show bg03 at shift_row(3):
    yalign 0.3 xalign 0
...
xalign sets both xanchor and xpos. Since I already set xpos and xanchor to 0 at the start of the transform, you don't need that (and, in fact, it overrides the stuff in the transform causing it to break). Just set yalign (or just ypos and/or yanchor). Note that you've got the y coords on one of those sets backwards - the image will end up upside down.
Kaen wrote: I also tried this but the images didn't move as well:

Code: Select all

show bg01 at shift_row(1)
pause 1
show bg02 at shift_row(2)
pause 1
show bg03 at shift_row(3)
...
I have no idea why this isn't working. Works for me. The thing that caused moving to break before is because you were specifying different values of xpos and xanchor (xalign sets both of those to the same value)

User avatar
Kaen
Regular
Posts: 148
Joined: Tue Oct 16, 2012 10:49 pm
Contact:

Re: Advanced Transition

#12 Post by Kaen »

I changed a few things and now the cropped pieces move.

First I had to change the pieces width to 799:

Code: Select all

image bg01 = im.Crop("image/bg color.png", (0, 540, 799, 60))
...
Then I tested several values of xalign until until -800.0 worked for me:

Code: Select all

transform shift_row(t):
    xanchor 0.0 xpos 0.9
    linear t xalign -800.0
I just don't understand why -800.0 value works and what I represents exactly. I thought this value would range from 0 to 1, as xalign 0 being the most left part of the screen and xalign 1 being the most right part. And a negative value would mean it's off screen, so xalign -1 would be like 1 screen width to the left.

If I change back the cropped piece width to 800, the -800.0 value won't make it disappear from the screen, it'll just move from the off screen right until it reaches the left part of the screen.

Also I'm having problems setting the yalign of each piece. Since my screen/image height is 600px, if each of the 10 pieces have 60px height, each piece have 10% of screen space, right? I understand that yalign ranges from 0 to 1, so 0.1 would represent 10%, right?

Though when I set the yaling like this, each piece is exceeding it's area and using another's piece area:

Code: Select all

show bg01 at shift_row(2):
    yalign 0.0
pause 0.3    
show bg02 at shift_row(2):
    yalign 0.1
...
Image

Those values are so confusing TwT"

Asceai
Eileen-Class Veteran
Posts: 1258
Joined: Fri Sep 21, 2007 7:13 am
Projects: a battle engine
Contact:

Re: Advanced Transition

#13 Post by Asceai »

Stop using xalign/yalign for this =P It's handy, but it's not the only way to position an image.

xalign and yalign do more than position the image, they anchor it as well. xalign -1.0 means xpos -1.0, which as you'll notice is in my transform code, but it also means xanchor -1.0, which means the anchor (the part of the image that the position refers to) is outside the image. Because of those two factors I don't even know what xalign -1.0 means. Use pos and anchor separately, don't just use align everywhere, you'll go crazy trying to figure things out. It's much simpler just to use anchor and pos =P

EDIT: Check out the built-in Ren'Py tutorial 'Screen Positions', it goes over pos/anchor/align

User avatar
Kaen
Regular
Posts: 148
Joined: Tue Oct 16, 2012 10:49 pm
Contact:

Re: Advanced Transition

#14 Post by Kaen »

OMG I started using pos and anchor instead of align and it works perfectly now XD

Thank you thank you thank you! I never understood exactly what each of those properties represented, but now that you explained I think I got it ;)

I guess now I have everything I need to finish this animation. When it's done I'll post here just in case anyone wanna see it.

User avatar
Kaen
Regular
Posts: 148
Joined: Tue Oct 16, 2012 10:49 pm
Contact:

Re: Advanced Transition

#15 Post by Kaen »

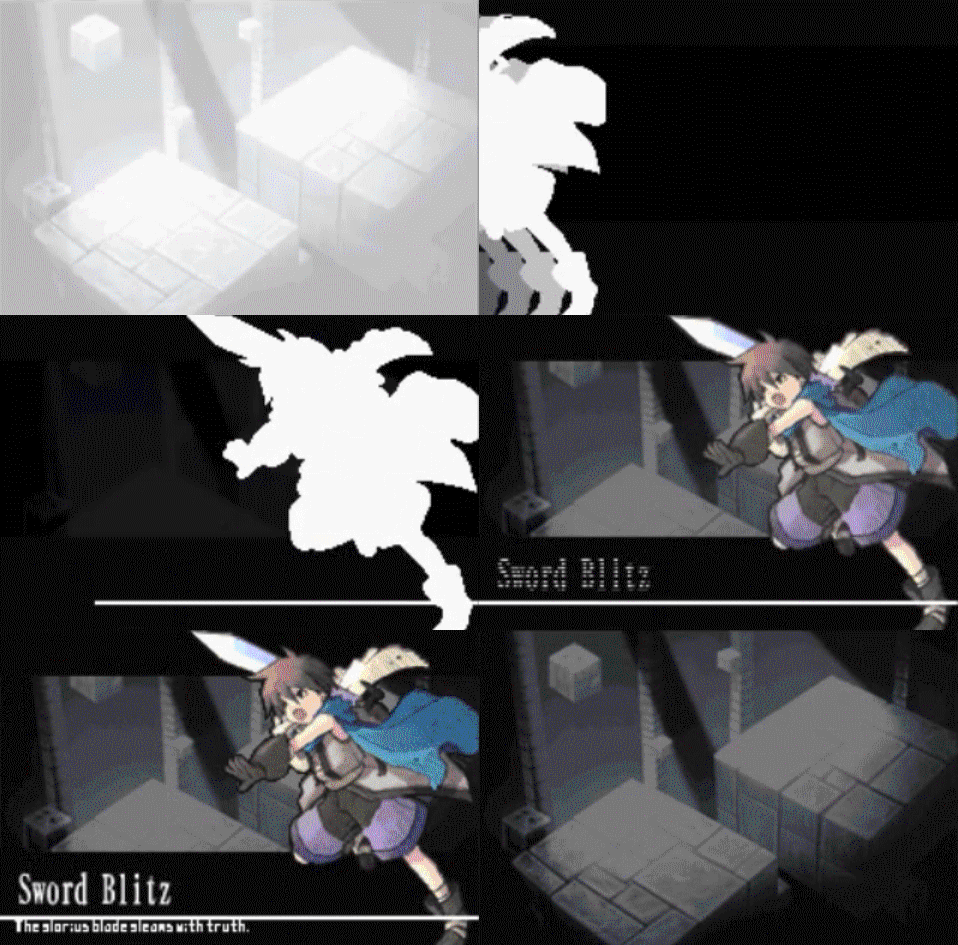
Here is the final work:

Image

Special thanks to Asceai for all the great assistance provided!

Post Reply

Who is online

Users browsing this forum: decocloud, DewyNebula