{Tutorial} Costomization Code For Games (MainMenu)

Discuss how to use the Ren'Py engine to create visual novels and story-based games. New releases are announced in this section.
Forum rules
This is the right place for Ren'Py help. Please ask one question per thread, use a descriptive subject like 'NotFound error in option.rpy' , and include all the relevant information - especially any relevant code and traceback messages. Use the code tag to format scripts.
Post Reply
Message
Author
Shiva_Production
Regular
Posts: 44
Joined: Tue Jan 12, 2016 10:19 am
Location: The Netherlands
Contact:

{Tutorial} Costomization Code For Games (MainMenu)

#1 Post by Shiva_Production »

Hay Hay,

I had a lot of trouble making a good GUI for my game, but here it is and I have put the code with it so people can use it.

It was a little difficult to figure out for me at first, how to put the things where I wanted them, but well hard work pays off :)
Here is the code use it well:

Code: Select all

label main_menu:
    show front
    
    $ ui.vbox (xpos=0, ypos=0)
    $ ui.imagebutton("Start.png", "Start.png", clicked=ui.returns("start"))
    $ ui.close()
    
    $ ui.vbox (xpos=627, ypos=0)
    $ ui.imagebutton("Load.png", "Load.png", clicked=ui.returns("load"))
    $ ui.close()
    
    $ ui.vbox (xpos=0, ypos=500)
    $ ui.imagebutton("Pref.png", "Pref.png", clicked=ui.returns("prefs"))
    $ ui.close()
    
    $ ui.vbox (xpos=631, ypos=500)
    $ ui.imagebutton("Quit.png", "Quit.png", clicked=ui.returns("quit"))
    $ ui.close()
    
    
    $ result = ui.interact()
    
    if result == "start":
        hide front
        $ renpy.jump_out_of_context("start")
        
        
    elif result == "load":
        jump load_screen
        
    elif result == "prefs":
        jump preferences_screen
            
    elif result == "quit":
        $ renpy.quit()

    return     
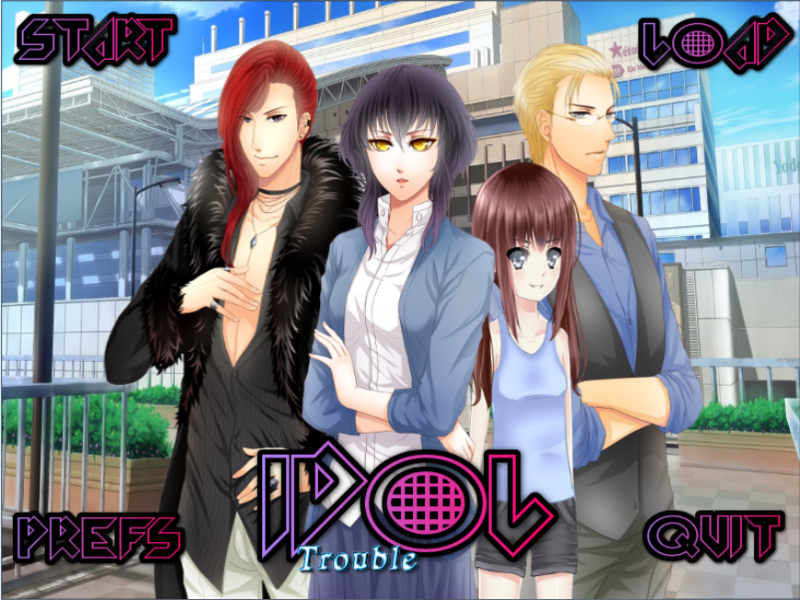
This is the result:
Image


So now to explain:

Code: Select all

label main_menu:
    show front
This is easy, this is as in the game itself, you define the image in the script part to use it here.

Code: Select all

  $ ui.vbox (xpos=0, ypos=0)
    $ ui.imagebutton("Start.png", "Start.png", clicked=ui.returns("start"))
    $ ui.close()
Then this, Make sure to have the vbox always ontop, otherwise the buttons will all stay in the left corner, (Hence why It was difficult for me to figure out.) The {Start.png} Is the picture you will use for the botton, {Even though I placed it twice, I have no idea why it has to.} Anyhow, you just have to put the picture into your game and you don't have to define this one.
Always close every Part with the ui.Close() code, or it will not work.

This you do with any kind of button you want in your menu, even a help button or extras or whatever.

Code: Select all

$ result = ui.interact()
    
    if result == "start":
        hide front
        $ renpy.jump_out_of_context("start")
        
        
    elif result == "load":
        jump load_screen
        
    elif result == "prefs":
        jump preferences_screen
            
    elif result == "quit":
        $ renpy.quit()

    return  
This is so the Cose you put in will jump towards the screen you want to. Load will go to The Load menu and Start will begin the game.

(I hope this was somewhat clear, since I am bad at understanding coding and this is what i think is the easiest to read and understand.)
Also more to come once I've figured out the rest!

User avatar
trooper6
Lemma-Class Veteran
Posts: 3712
Joined: Sat Jul 09, 2011 10:33 pm
Projects: A Close Shave
Location: Medford, MA
Contact:

Re: {Tutorial} Costomization Code For Games (MainMenu)

#2 Post by trooper6 »

This code is really old and there are much better ways to do this nowadays.
You want to use screen language (Which is documented here: http://www.renpy.org/doc/html/screens.html)

Anyhow, if you want to place for buttons on your main menu, all you need to do is edit the main menu screen.

If you go to your screens.rpy file, you will see this section of code:

Code: Select all

##############################################################################
# Main Menu
#
# Screen that's used to display the main menu, when Ren'Py first starts
# http://www.renpy.org/doc/html/screen_special.html#main-menu

screen main_menu():

    # This ensures that any other menu screen is replaced.
    tag menu

    # The background of the main menu.
    window:
        style "mm_root"

    # The main menu buttons.
    frame:
        style_group "mm"
        xalign .98
        yalign .98

        has vbox

        textbutton _("Start Game") action Start()
        textbutton _("Load Game") action ShowMenu("load")
        textbutton _("Preferences") action ShowMenu("preferences")
        textbutton _("Help") action Help()
        textbutton _("Quit") action Quit(confirm=False)


init -2:

    # Make all the main menu buttons be the same size.
    style mm_button:
        size_group "mm"
All you have to do is take out that frame with the buttons and place your own image buttons where you want them, like so:

Code: Select all

##############################################################################
# Main Menu
#
# Screen that's used to display the main menu, when Ren'Py first starts
# http://www.renpy.org/doc/html/screen_special.html#main-menu

screen main_menu():

    # This ensures that any other menu screen is replaced.
    tag menu

    # The background of the main menu.
    window:
        style "mm_root"

    # The main menu buttons.
    imagebutton:
        xpos 0
        ypos 0
        idle "start_idle.png" 
        hover "start_hover.png" 
        action Start()
    imagebutton:
        xpos 627 
        ypos 0
        idle "load_idle.png" 
        hover "load_hover.png" 
        action ShowMenu("load")
    imagebutton:
        xpos 0 
        ypos 500
        idle "prefs_idle.png" 
        hover "prefs_hover.png" 
        action ShowMenu("preferences")
    imagebutton:
        xpos 631 
        ypos 500
        idle "quit_idle.png" 
        hover "quit_hover.png" 
        action Quit(confirm=False)

init -2:

    # Make all the main menu buttons be the same size.
    style mm_button:
        size_group "mm"
My version has a hover image for each button, because I think it looks better, but you can delete that line and it will be fine.
A Close Shave:
*Last Thing Done (Aug 17): Finished coding emotions and camera for 4/10 main labels.
*Currently Doing: Coding of emotions and camera for the labels--On 5/10
*First Next thing to do: Code in all CG and special animation stuff
*Next Next thing to do: Set up film animation
*Other Thing to Do: Do SFX and Score (maybe think about eye blinks?)
Check out My Clock Cookbook Recipe: http://lemmasoft.renai.us/forums/viewto ... 51&t=21978

Shiva_Production
Regular
Posts: 44
Joined: Tue Jan 12, 2016 10:19 am
Location: The Netherlands
Contact:

Re: {Tutorial} Costomization Code For Games (MainMenu)

#3 Post by Shiva_Production »

trooper6 wrote:This code is really old and there are much better ways to do this nowadays.
You want to use screen language (Which is documented here: http://www.renpy.org/doc/html/screens.html)

Anyhow, if you want to place for buttons on your main menu, all you need to do is edit the main menu screen.

If you go to your screens.rpy file, you will see this section of code:

Code: Select all

##############################################################################
# Main Menu
#
# Screen that's used to display the main menu, when Ren'Py first starts
# http://www.renpy.org/doc/html/screen_special.html#main-menu

screen main_menu():

    # This ensures that any other menu screen is replaced.
    tag menu

    # The background of the main menu.
    window:
        style "mm_root"

    # The main menu buttons.
    frame:
        style_group "mm"
        xalign .98
        yalign .98

        has vbox

        textbutton _("Start Game") action Start()
        textbutton _("Load Game") action ShowMenu("load")
        textbutton _("Preferences") action ShowMenu("preferences")
        textbutton _("Help") action Help()
        textbutton _("Quit") action Quit(confirm=False)


init -2:

    # Make all the main menu buttons be the same size.
    style mm_button:
        size_group "mm"
All you have to do is take out that frame with the buttons and place your own image buttons where you want them, like so:

Code: Select all

##############################################################################
# Main Menu
#
# Screen that's used to display the main menu, when Ren'Py first starts
# http://www.renpy.org/doc/html/screen_special.html#main-menu

screen main_menu():

    # This ensures that any other menu screen is replaced.
    tag menu

    # The background of the main menu.
    window:
        style "mm_root"

    # The main menu buttons.
    imagebutton:
        xpos 0
        ypos 0
        idle "start_idle.png" 
        hover "start_hover.png" 
        action Start()
    imagebutton:
        xpos 627 
        ypos 0
        idle "load_idle.png" 
        hover "load_hover.png" 
        action ShowMenu("load")
    imagebutton:
        xpos 0 
        ypos 500
        idle "prefs_idle.png" 
        hover "prefs_hover.png" 
        action ShowMenu("preferences")
    imagebutton:
        xpos 631 
        ypos 500
        idle "quit_idle.png" 
        hover "quit_hover.png" 
        action Quit(confirm=False)

init -2:

    # Make all the main menu buttons be the same size.
    style mm_button:
        size_group "mm"
My version has a hover image for each button, because I think it looks better, but you can delete that line and it will be fine.
Ah so, if only you were here sooner, but I have it like this and it works too, luckily.
I tried this one, but it just gives me a lot of trouble to get everything right. For some reason all I get is Error codes and with mine I get it directly. (Even so I don't know how to get the hover of the button, but I imagine it is the same but with the Hover image.)

I guess it is what you think works best, I will thank you for this since it's really handy for other people :)

User avatar
trooper6
Lemma-Class Veteran
Posts: 3712
Joined: Sat Jul 09, 2011 10:33 pm
Projects: A Close Shave
Location: Medford, MA
Contact:

Re: {Tutorial} Costomization Code For Games (MainMenu)

#4 Post by trooper6 »

Which error codes are you getting? And what does your code look like when you try what I posted?

I do think longterm, it is better to use screen language than to use the older, outdated method.
A Close Shave:
*Last Thing Done (Aug 17): Finished coding emotions and camera for 4/10 main labels.
*Currently Doing: Coding of emotions and camera for the labels--On 5/10
*First Next thing to do: Code in all CG and special animation stuff
*Next Next thing to do: Set up film animation
*Other Thing to Do: Do SFX and Score (maybe think about eye blinks?)
Check out My Clock Cookbook Recipe: http://lemmasoft.renai.us/forums/viewto ... 51&t=21978

Shiva_Production
Regular
Posts: 44
Joined: Tue Jan 12, 2016 10:19 am
Location: The Netherlands
Contact:

Re: {Tutorial} Costomization Code For Games (MainMenu)

#5 Post by Shiva_Production »

trooper6 wrote:Which error codes are you getting? And what does your code look like when you try what I posted?

I do think longterm, it is better to use screen language than to use the older, outdated method.
I got a long code, but That was probably because I didn't have the hover things and I inclueded them, when I removed them it was fine.

And yes longterm is better and When I use your code it looks the same so I guess it doesn't make much different except I don't have the hovers yet. (Working on them)

Thank you for the advise and help with it \(^,^)/

Post Reply

Who is online

Users browsing this forum: Google [Bot]