Thanks you. ^-^
Hand-painted backgrounds still look the best but not all of us have that sort of time.
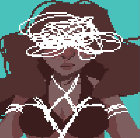
To tell you the truth, that image took me 2 hours of playing around with. I might as well paint something instead.

Someone asked how I got the effect in a pm. I'll just post it here too. It's not the exact way I did it BUT it's the way I do most photo related BGs.
Step Zero: I make sure the image is 800 x 600 first, which is the default for RenPy. The filters don't work the same way if the image is huge. And it's because I don't want to figure out the settings for those. XD
Simple Filters
For most of my images which aren't too complicated, I use these two filters. The snow screenshot for Frozen Essence was made with these two filters as well. Then you'll have time to paint into the BG too
 Steps:
1.)Fix color first with hue, saturation, etc. Try to start with the most cartoonish looking colors (or ones that will match your VN).
2.)Duplicate the layer
3.)Filters
-Gaussian Blur at around 1.5
-Paint Daubs at 6 or 7, and sharpness at 2 to 5 (depends on your image so you will have to test it.)
4.)Lighten or Soft light or overlay the image.
5.)DONE! With some images, it will look better with deeper shadows. Make a new transparent layer. Then paint some more cartoon-ish shadows with gray paint. Set the blending option to hardlight or multiply. There are other things you can add. I added snow to my image because snow is easy
.
6.)Try repeating the filter steps above again to see if it makes the image look better or not.
Note: Some outdoor images look better if you paint your own solid blue sky. The original sky sometimes doesn't cut it.
Steps for the photo in the thread.
This one is hard because the starting image is tough. It actually took me over 2 hours to get that effect. I felt like I should just paint one instead. o_O
I'll try to remember but it is almost like this.
0.)Resize Image to 800x600
1.)Fix color with hue, saturation, etc
2.)Fix color version 2. I made a new layer, used an orange paint bucket to give it warmth, and used some sort of blending option. It helped lower the tone of the bright light of the window. I repeated this twice.
3.)Duplicate the background layer, and do those two steps above (Gaussian Blur, and Paint Daubs, lighten or soft light blending option).
4.)The image still doesn't look cartoony so....
Duplicate the original layer
5.)Filter -> sketch - Ink outline - adjust until you get a clean outline
6.)Play around with the blending option until you get the desired look
7.)It still looks uncartoony so...
Repeat everything above and blend it.

I adjusted the colors with color balance and hue for random layers.
8.)I merged all the layers after that, duplicated the layer again and used Gaussian blur at 1.0 - 1.5. I blended it again.
---
Remember, the steps for the photo won't work for all images but it's just the filters I used that you can play with.
Some images work with the cut out filter. I used that to get solid colors. I MIGHT have used that filter too but I don't remember. XD
I hope that will help you guys make your photos more cartoonish.