Sprite making step-by-step + free PSD sprite
Posted: Mon Feb 28, 2011 12:34 pm
Spawned from this http://lemmasoft.renai.us/forums/viewto ... =26&t=9154
Over the weekend, I thought I could make a somewhat random and 'quick' (though I'm slow at this >>; ) sprite starting from 0 and show you guys how I did it. Maybe it'll help somebody? Or at least be fun or interesting to look at ^^; ?
There are two versions of this character for you to download:
Open step-by-step PSD
I made it in SAI, so there's a chance some of the screen and overlay layers won't look the same in other programs. It has layer folders/groups with each step that you can look at, and you're free to recolor and modify stuff as you please.
Closed/merged PSD
Only last step, with base merged and each face element flattened and organized in folders.
You may want to resize the sprite to use it, it's kind of big to use as it is, but not too big... I never pay much attention to the size I'm working on, to be honest "Orz (it's bad, don't do that)
You can see the images by clicking on the 'Step #' title, I tried to make a post with images, but it was huge, so I left them just as links >>;
Step 1
Yes, my rough sketches are hideous!
I create a new canvas, usually the size of the screen the game is going to be, and then go and upscale it a bit. I was taught that, ideally, you should work 15% bigger than the final size your image is going to be displayed (or printed). I often forget to do this and just work at screen resolution, which is not very wise... so don't do that if you can avoid it ^^;
Then I roughly, VERY roughly, sketch the iea of the pose I have in mind. It's just a rough idea, so can do it quickly and scrap it or change it without much time spent.
Step 2
Still ugly, but taking shape.. at least.
Since my rough sketches are so hideous, I need to make a new layer on top and polish the pose so it looks more like a human being. I try to look at some anatomy references and myself on a mirror so I have an idea of what the pose really should look like, and i end up making some changes from the original rough idea. I still make a lot of mistakes at this point, but at least now it has more shape >>;
Step 3
Oh, it's a character...! I think.
Now that I have a rough template to draw my character on, I make a new layer on top (again) and sketch my character. Since I don't plan this one to have different outfits or anything, I just sketch her fully clothed. I end up making new changes to the pose as I go (and end up using my default 3/4 head. Oh dear...)
I try to get this as... well, not really 'clean', but at least clean enough so I can understand my own messy lines, so I can ink over them later.
Being the messy person I am, sometimes I have to make yet another sketch, a cleaner one, since I can't decipher what the hell is going on with all the messy lines everywhere >>;
Step 4
Lineart time. Have I ever mentioned I have no patience for inking stuff? Dx
So, new layer, hard round small brush, and lots of patience.
I don't do this in just one layer, I use two or three for things that overlap (like the hair over the dress), so I can erase safely the lines that aren't really supposed to be there in the final lines. I merge them together in the end.
At this point, I have to rely on references and my handy mirror to get things right, since I can't half-ass things at this point anymore! I end up making the last changes to the drawing at this point.
Now, since I plan to make several face expressions on his character, I ink the face separately.
Step 5
Flats!
Layers here.
I make a new layer for each element of the drawing and lay the flat color of that element down. You can have all the flats in one layer and then shade on a different layer, but I personally think it's more organized this way.
I check the colors and play with them until I'm satisfied. I may change my mind later on, though (I tend to do that a lot).
Step 6
Shading! Woot!
Layers over here.
Now this is my fav part
I shade everything! yay! And... that's pretty much it ^^; Generic ambiguous light source ftw.
I use some overlay, multiply and addition layers for some effects as I go. I add a free stock pattern to the dress and end up changing its color ^^;
I also change the color of the lineart and set it to multiply.
Step 6.5
Extra unnecessary step C:
Layers are here.
This, I don't usually do it, but it's still fun, so.. yeah.
I paint over some parts on a new layer over the lineart (sometimes, if i'm not touching the base anymore, I just flatten/merge it), adding extra hair strands, thinning or softening lines here and there, add even more effect layers on top...
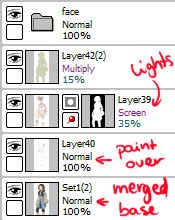
Step 7
Fun with the Face time!
I make folders for each element, grouping mouth positions together, eyes together, etc, and just play around, really. Fun things about keeping face elements separated is that you can combine them and make a lot of different faces C:
You can see the layer folders here.
Now, the finished image looks nothing like the idea I had in mind when I started with the rough sketch, but it's ok, it still looks nice, I think xD;
Over the weekend, I thought I could make a somewhat random and 'quick' (though I'm slow at this >>; ) sprite starting from 0 and show you guys how I did it. Maybe it'll help somebody? Or at least be fun or interesting to look at ^^; ?
Open step-by-step PSD
I made it in SAI, so there's a chance some of the screen and overlay layers won't look the same in other programs. It has layer folders/groups with each step that you can look at, and you're free to recolor and modify stuff as you please.
Closed/merged PSD
Only last step, with base merged and each face element flattened and organized in folders.
You may want to resize the sprite to use it, it's kind of big to use as it is, but not too big... I never pay much attention to the size I'm working on, to be honest "Orz (it's bad, don't do that)
You can see the images by clicking on the 'Step #' title, I tried to make a post with images, but it was huge, so I left them just as links >>;
Step 1
Yes, my rough sketches are hideous!
I create a new canvas, usually the size of the screen the game is going to be, and then go and upscale it a bit. I was taught that, ideally, you should work 15% bigger than the final size your image is going to be displayed (or printed). I often forget to do this and just work at screen resolution, which is not very wise... so don't do that if you can avoid it ^^;
Then I roughly, VERY roughly, sketch the iea of the pose I have in mind. It's just a rough idea, so can do it quickly and scrap it or change it without much time spent.
Step 2
Still ugly, but taking shape.. at least.
Since my rough sketches are so hideous, I need to make a new layer on top and polish the pose so it looks more like a human being. I try to look at some anatomy references and myself on a mirror so I have an idea of what the pose really should look like, and i end up making some changes from the original rough idea. I still make a lot of mistakes at this point, but at least now it has more shape >>;
Step 3
Oh, it's a character...! I think.
Now that I have a rough template to draw my character on, I make a new layer on top (again) and sketch my character. Since I don't plan this one to have different outfits or anything, I just sketch her fully clothed. I end up making new changes to the pose as I go (and end up using my default 3/4 head. Oh dear...)
I try to get this as... well, not really 'clean', but at least clean enough so I can understand my own messy lines, so I can ink over them later.
Being the messy person I am, sometimes I have to make yet another sketch, a cleaner one, since I can't decipher what the hell is going on with all the messy lines everywhere >>;
Step 4
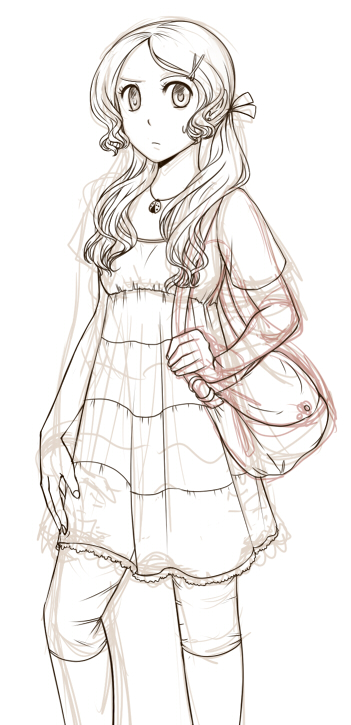
Lineart time. Have I ever mentioned I have no patience for inking stuff? Dx
So, new layer, hard round small brush, and lots of patience.
I don't do this in just one layer, I use two or three for things that overlap (like the hair over the dress), so I can erase safely the lines that aren't really supposed to be there in the final lines. I merge them together in the end.
At this point, I have to rely on references and my handy mirror to get things right, since I can't half-ass things at this point anymore! I end up making the last changes to the drawing at this point.
Now, since I plan to make several face expressions on his character, I ink the face separately.
Step 5
Flats!
Layers here.
I make a new layer for each element of the drawing and lay the flat color of that element down. You can have all the flats in one layer and then shade on a different layer, but I personally think it's more organized this way.
I check the colors and play with them until I'm satisfied. I may change my mind later on, though (I tend to do that a lot).
Step 6
Shading! Woot!
Layers over here.
Now this is my fav part
I shade everything! yay! And... that's pretty much it ^^; Generic ambiguous light source ftw.
I use some overlay, multiply and addition layers for some effects as I go. I add a free stock pattern to the dress and end up changing its color ^^;
I also change the color of the lineart and set it to multiply.
Step 6.5
Extra unnecessary step C:
Layers are here.
This, I don't usually do it, but it's still fun, so.. yeah.
I paint over some parts on a new layer over the lineart (sometimes, if i'm not touching the base anymore, I just flatten/merge it), adding extra hair strands, thinning or softening lines here and there, add even more effect layers on top...
Step 7
Fun with the Face time!
I make folders for each element, grouping mouth positions together, eyes together, etc, and just play around, really. Fun things about keeping face elements separated is that you can combine them and make a lot of different faces C:
You can see the layer folders here.
Now, the finished image looks nothing like the idea I had in mind when I started with the rough sketch, but it's ok, it still looks nice, I think xD;